TL;DR
Moving your noisy rig into a closet or separate room is the most effective way to reduce sound. Proper ventilation and strategic placement are key to keeping it cool and quiet. Acoustic foam helps with reflections, but soundproofing and vibration isolation are crucial for real silence.
Ever tried to work next to a high-power AI rig? The constant hum, whine of fans, and heat blast make it impossible to focus. Yet, many assume the only way is endless foam panels or soundproofing walls. The truth? Distance and ventilation beat everything else.
If your setup’s too loud or hot, you’re not alone. The secret is to think outside the desk. Moving your rig into another room, or even a closet, can make your workspace eerily quiet and cool — without sacrificing performance. This article will show you how to do it right, cutting noise and heat while keeping your gear happy.
Acoustic dampening
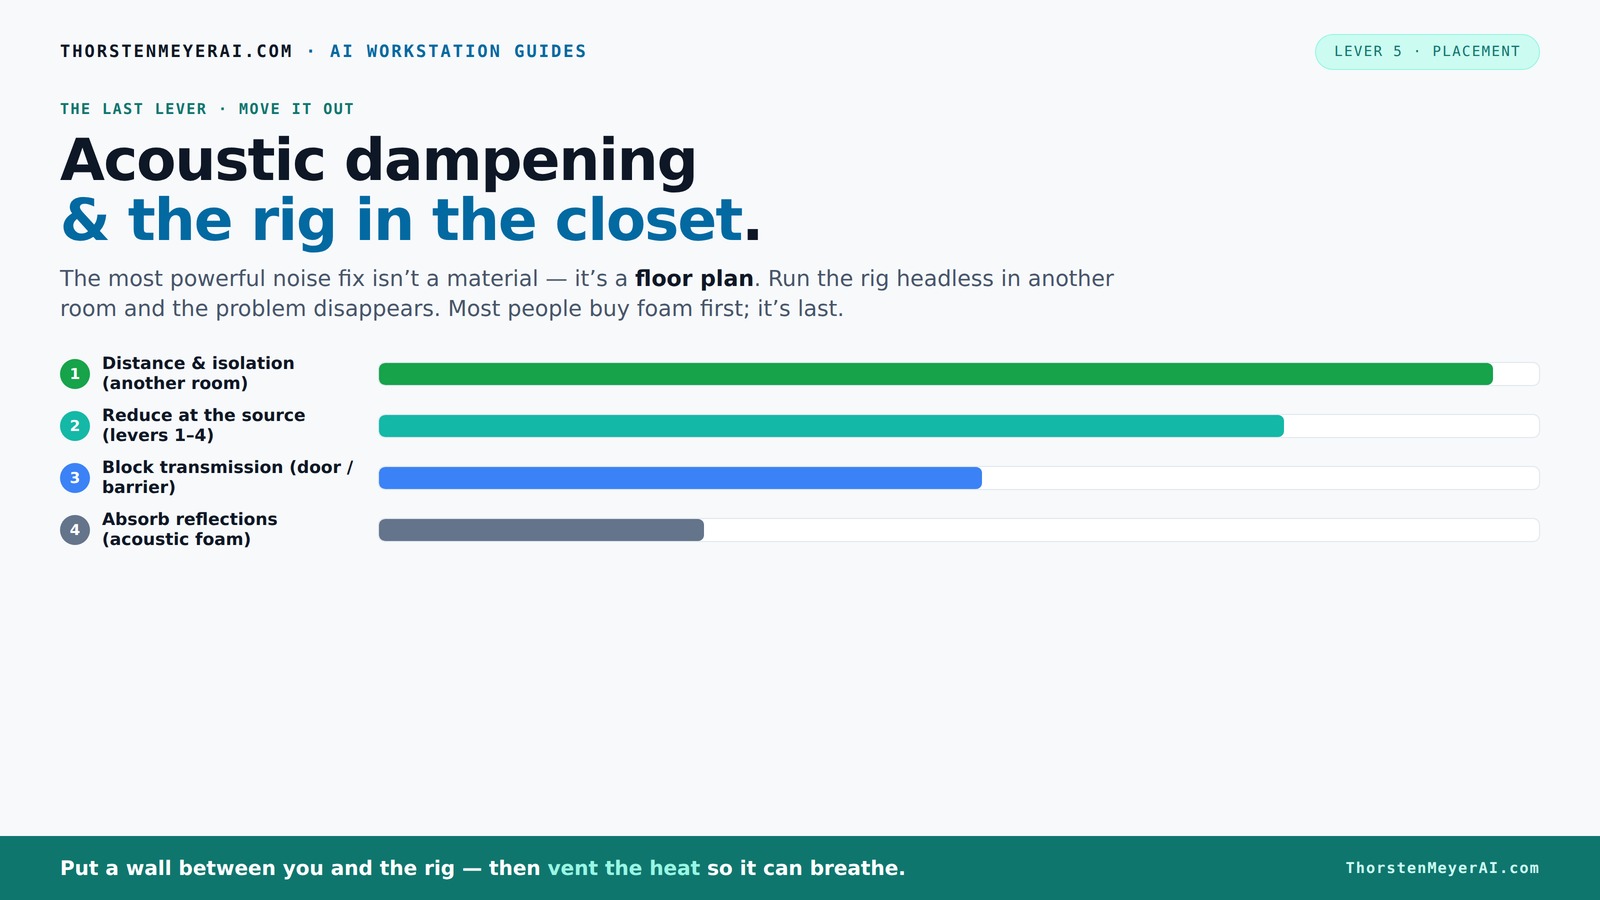
& the rig in the closet.
The most powerful noise fix isn’t a material — it’s a floor plan. A rig you can’t hear because it’s in another room beats any amount of foam. Tap the approaches in Part 1 to see what actually works.
(another room)
(levers 1–4)
(door / barrier)
(acoustic foam)
Contain the noise, not the heat
Key Takeaways
- Moving your rig into another room or closet is the most effective way to eliminate noise.
- Proper ventilation is critical—sealed closets trap heat, causing throttling and damage.
- Start with mic placement before adding treatment—reflective surfaces near the mic cause the most issues.
- Seal all gaps around doors, outlets, and flooring to prevent sound leaks.
- Use thick bass traps in corners to control low-frequency buildup in small spaces.
soundproofing acoustic foam panels for computer rigs
As an affiliate, we earn on qualifying purchases.
As an affiliate, we earn on qualifying purchases.
Why Moving Your Rig Beats Foam for Silence
Moving your noisy rig into another room is the most effective way to cut down sound. Foam panels only absorb reflections inside a space—they don’t stop sound from escaping. When you relocate the entire machine away from your workspace, noise simply stops mattering.
Imagine your GPU tower in a closet across the hall. You can work peacefully, hearing nothing but silence. That’s because distance reduces sound transmission exponentially. Plus, it’s far cheaper and easier than endless foam or sealing every crack.
For example, a creator I know installed his AI server in a basement closet. The noise level dropped from 70 dB at his desk to near silence. That’s the power of just moving the rig.
quiet computer case with vibration isolation
As an affiliate, we earn on qualifying purchases.
As an affiliate, we earn on qualifying purchases.
The ‘Rig in the Closet’ Setup: How to Do It Without Melting Your Skin
Placing a powerful, heat-generating machine in a closet can be a game-changer. But there’s a catch: heat. Without proper airflow, your rig will turn into a toaster. The trick? Ventilation.
Use active ventilation — a quiet exhaust fan pulling hot air out and bringing in cooler air. You might even install a thermostat-controlled vent for smarter airflow. Serious soundproof cabinets use ducted fans and insulation, balancing noise reduction with cooling.
For example, a streamer built a custom closet setup with a silent exhaust fan and thick acoustic foam lining. His rig runs cool, quiet, and stress-free, even during 24/7 training runs. The key is to breathe life into the closet.
ventilated closet for PC setup
As an affiliate, we earn on qualifying purchases.
As an affiliate, we earn on qualifying purchases.
Placement and Acoustic Treatment: The Perfect Combo
Acoustic dampening is about managing reflections—it's not the same as soundproofing. In a small closet, echoes bounce off hard surfaces, creating harsh reverb. Proper placement of gear and treatment can fix this.
Start with the microphone. Position it away from walls and reflective surfaces. Then, treat the wall behind the mic with absorption panels. Use soft materials like thick blankets or foam to tame flutter echoes.
For example, a voiceover artist placed her mic near a corner with thick foam on the ceiling and side walls. Her recordings went from echoey to professional-quality. Placement first, then treatment—don’t buy more foam until you understand where reflections come from.
soundproof door barrier for server room
As an affiliate, we earn on qualifying purchases.
As an affiliate, we earn on qualifying purchases.
The Secret Weapon: Strategic Placement of Acoustic Panels
Where you put your acoustic panels matters more than how many you buy. For a closet studio, focus on the reflection points: behind the mic, ceiling, and nearby walls. Use a mirror trick to find these spots—place a mirror on the wall, and see where your reflection from the mic position appears.
Heavy bass traps in the corners help with low-frequency buildup, common in small spaces. Thick, dense panels absorb the rumble that bass frequencies produce, preventing muddy recordings and unnatural booms. Bass traps are essential for tight, clear sound.
For instance, a musician added bass traps to the closet corners, and suddenly her recordings sounded clearer, with no low-end muddiness. Placement is everything.
How to Stop Sound Leaks Through Gaps and Cracks
Cracks around doors, outlets, and flooring are major weak points. Sound leaks through these gaps, making your quiet room noisy outside. Seal everything with weatherstripping, acoustic sealant, or draft stoppers.
For example, sealing a closet door with weatherstripping reduced external noise by over 60%. It’s a simple fix but incredibly effective.
Don’t forget outlets and vents—cover them with acoustic gaskets or foam inserts. Every tiny gap lets sound escape or enter, defeating your efforts.
The Role of Placement and Surface Management in Small Spaces
Your mic placement and nearby surfaces determine how much sound reflects into the microphone. Keep flat, hard surfaces away from the mic—cover desks, doors, and windows with soft materials.
In a tiny closet, even the door can reflect sound directly into the mic. Hanging a moving blanket over the door or lining the walls with foam can drastically cut reverb and flutter echoes.
For example, a YouTuber wrapped his closet door with a thick blanket, and his vocal recordings gained warmth and clarity. Placement and surface treatment go hand-in-hand.
DIY Solutions & Portable Gear: Cheap Tricks for Great Sound
DIY acoustic solutions are popular because they’re cheap, flexible, and non-invasive. Use moving blankets, DIY foam panels, or even furniture to break up reflections. These are especially handy in small closets where permanent modifications aren’t feasible.
For example, a creator used cheap foam panels from Amazon and hung thick blankets across the closet walls. Her recordings improved overnight—no need for permanent drywall work.
Portable reflection filters and auto-poles also make a big difference without tearing apart your space. It’s all about strategic placement of soft, absorbent materials.
Handling Low Frequencies & Deep Buildup in Small Closets
Low frequencies are the sneakiest. They build up in corners and cause boomy, muddy sound. Thick bass traps are your best bet—preferably around 4 inches or more of dense material like rockwool or fiberglass.
In a small closet, placing bass traps in the corners—especially at the ceiling-wall junction—can cut down on low-end rumble by over 50%. This keeps your recordings tight and clear.
For example, a voice actor installed thick bass traps in the closet corners, and her recordings transformed from muffled to crisp. Deep bass control isn’t optional—it’s essential.
Frequently Asked Questions
Is acoustic dampening the same as soundproofing?
No. Acoustic dampening reduces echoes and reflections inside a room, making it sound better. Soundproofing blocks sound from passing through walls or doors, preventing noise from escaping or entering.
Where should I place acoustic panels in my closet studio?
Place panels at reflection points—behind your mic, on the ceiling, and on side walls near the mic. Use a mirror trick to find these spots—position panels where your reflection appears when looking from the mic.
How do I stop echo and reverb in a small closet?
Use soft materials like thick blankets, foam panels, and rugs. Cover hard surfaces and corners with bass traps. Proper placement of soft, absorbent materials minimizes flutter echo and harsh reflections.
Do foam panels really work, or do I need thick fiberglass?
Foam panels work well for high frequencies and reflections but aren’t effective at low-end control. For deep bass, thicker, denser materials like fiberglass or rockwool in traps are necessary.
How many panels do I need for a small closet?
It depends on your space and goals. Generally, covering the reflection points and corners with 2-4 inch thick panels, plus bass traps in corners, makes a noticeable difference. Start small and add as needed.
Conclusion
Sometimes, the best way to quiet your setup isn’t more foam—it’s moving it away. A closet or a different room, with proper airflow, makes a huge difference. Think of your space as a fortress: strong, ventilated, and well-placed.
Remember, a quiet, cool rig isn’t just about treatment; it’s about strategy. Master placement, ventilation, and sealing, and you’ll turn even the tiniest closet into a professional-sounding studio. Now go build that perfect, peaceful workspace.